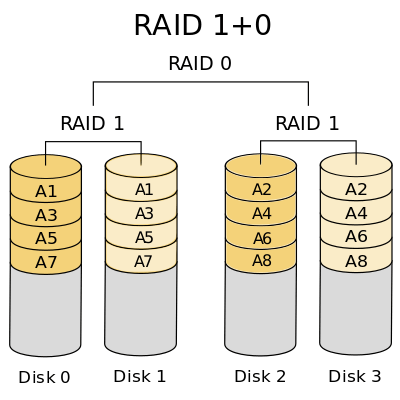
Creating a RAID 10 Array
The RAID 10 array type is traditionally implemented by creating a striped RAID 0 array composed of sets of RAID 1 arrays. This nested array type gives both redundancy and high performance, at the expense of large amounts of disk space. The mdadm utility has its own RAID 10 type that provides the same type of benefits with increased flexibility. It is not created by nesting arrays, but has many of the same characteristics and guarantees. We will be using the mdadm RAID 10 here.
- Requirements: minimum of 4 storage devices
- Primary benefit: Performance and redundancy
- Things to keep in mind: The amount of capacity reduction for the array is defined by the number of data copies you choose to keep. The number of copies that are stored with
mdadmstyle RAID 10 is configurable.
Identify the Component Devices
To get started, find the identifiers for the raw disks that you will be using:
lsblk -o NAME,SIZE,FSTYPE,TYPE,MOUNTPOINT
The output will be something like this:
NAME   SIZE  FSTYPE  TYPE MOUNTPOINT
sda    500G          disk
sdb    500G          disk
sdc    500G          disk
sdd    500G          disk
vda    120G          disk
├─vda1 100G    ext4  part /
└─vda15  1M          part
As you can see above, we have four disks without a filesystem, each 500G in size. In this example, these devices have been given the /dev/sda, /dev/sdb, /dev/sdc, and /dev/sdd identifiers for this session. These will be the raw components we will use to build the array.
Create the Array
To create a RAID 10 array with these components, pass them in to the mdadm --create command. You will have to specify the device name you wish to create (/dev/md0 in our case), the RAID level, and the number of devices:
sudo mdadm --create --verbose /dev/md0 --level=10 --raid-devices=4 /dev/sda /dev/sdb /dev/sdc /dev/sdd
The mdadm tool will start to configure the array (it actually uses the recovery process to build the array for performance reasons). This probably take some time to complete, but the array can be used during this time. You can monitor the progress of the mirroring by checking the /proc/mdstat file:
cat /proc/mdstat
Output
Personalities : [raid6] [raid5] [raid4] [linear] [multipath] [raid0] [raid1] [raid10]
md0 : active raid10 sdd[3] sdc[2] sdb[1] sda[0]
 209584128 blocks super 1.2 512K chunks 2 near-copies [4/4] [UUUU]
 [===>.................] resync = 18.1% (37959424/209584128) finish=13.8min speed=206120K/sec

unused devices: <none>
As you can see in the first highlighted line, the /dev/md0 device has been created in the RAID 10 configuration using the /dev/sda, /dev/sdb, /dev/sdc and /dev/sdd devices. The second highlighted area shows the layout that was used for this example (2 copies in the near configuration). The third highlighted area shows the progress on the build. You can continue the guide while this process completes.
Create and Mount the Filesystem
Next, create a filesystem on the array:
sudo mkfs.ext4 -F /dev/md0
Create a mount point to attach the new filesystem:
sudo mkdir -p /mnt/md0
You can mount the filesystem by typing:
sudo mount /dev/md0 /mnt/md0
Check whether the new space is available by typing:
df -h -x devtmpfs -x tmpfs
Output
Filesystem   Size  Used   Avail  Use%  Mounted on
/dev/vda1     20G  1.1G     18G    6%  /
/dev/md0    1898G   60M   1897G    1%  /mnt/md0
Finally the new filesystem is mounted and accessible.
Save the Array Layout
To make sure that the array is reassembled automatically at boot, we will have to adjust the /etc/mdadm/mdadm.conf file. We can automatically scan the active array and append the file by typing:
sudo mdadm --detail --scan | sudo tee -a /etc/mdadm/mdadm.conf
Afterwards, you can update the initramfs, or initial RAM file system, so that the array will be available during the early boot process:
sudo update-initramfs -u
Add the new filesystem mount options to the /etc/fstab file for automatic mounting at boot:
echo '/dev/md0 /mnt/md0 ext4 defaults,nofail,discard 0 0' | sudo tee -a /etc/fstab
As a result your RAID 10 array should now automatically be assembled and mounted each boot.
Check how to do other raid arrays: Raid 0, Raid 1, Raid 5.